
This project builds upon my original one-button universal remote you can view here.
I was part of a team at the Tikkun Olam Makers: TOM NYC makeathon last weekend. Without knowing about my previous work, Dwight was interested in working on a one-button remote so that he could fully control all the functions of his TV. For Dwight using stock remotes with the usual grid of many small buttons is not an option. Also there were some situations and functions for which voice activated solutions like Amazon Echo paired with a Logitech Harmony didn’t work out well enough. Below is a video of our finished device in use in Dwight’s home:
During the 3 days of the makeathon we worked on many improvements and last minute tweaks to the original design to make it more portable and usable for a larger number people. These included having new components built-in to avoid too many external parts and tools needed for the install and usage. These new built-in components included:
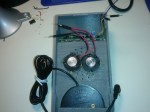
- LCD screen to show the current menu option in addition to the voiced version
- speaker of sufficient volume
- large button while preserving a switch jack for an optional custom switch
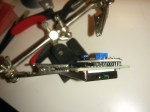
- IR learning receiver to capture raw IR with carrier intact for learning codes from original remotes
- removable SD card to store learned IR codes
- data/power USB cable to configure with computer or attach to power or battery for portability
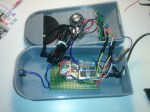
- 3D printed enclosure to keep all the electronics in place, secure and protected
I’m very grateful to my team’s experience, effort, and insight. I focused on the electronics and coding, but the 3D printing expertise, testing, and design ideas from other team members are what really brought everything together. As a team we were able to produce a polished and functional enough prototype in time to win the “Most Independent” award.
In a later pass if we have time we may slim down the enclosure among other changes. It was only originally made that large to accommodate a large powerful speaker to be more easily heard during this loud event. Below are some pictures from the event and some high level build steps.


Since IR only transmits line-of-sight (though it can bounce a bit), an important consideration is making sure your sent IR codes actually hit the IR receivers on the target devices (TV, cable box, etc). This is especially important to consider since unlike a typical IR remote usage scenario, our users are not able to easily re-point the remote until it works. To address this in the different environments our device may be used in it can be configured in one of two modes.
In stand alone mode, many high power IR LEDs are installed around the edge of the device pointing in different directions so that at any angle there will be some direct (or almost direct) path to the piece of electronics being controlled. This can be a workable solution and is employed by many IR blaster devices including Logitech Harmony.
In satellite mode, the central remote (which does move around with the user) sends the timings of the intended IR code over RF to “satellite” transmitters which are stationary, well placed and aimed to send the actual IR codes.
These modes are selectable at compile-time in the code. When building the hardware you can wire up only the version you intend to use, or both.
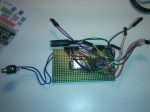
Here are the component lists and schematics:
Central Remote
- Teensy 3.5: MCU (w/ built-in micro SD card slot to store recorded IR codes)
- EMIC 2: speech synthesis and output
- RFM69HCW: RF tranceiver (communication w/ satellites if used)
- LCD panel, 4.7K resistor (2): (2×16 character display, w/ I2C module)
- TSMP58000: modulated IR receiver (carrier output so frequency can be calculated)
- mono audio jack: jack for optional external switch
- 8 ohm speaker (2)
- large switch
- TSAL6200 (2), N2222, 1K resistor: IR LEDs and driver (if not using satellites)
- 10000 mAh power bank: power supply for portable use

Satellite (if used)
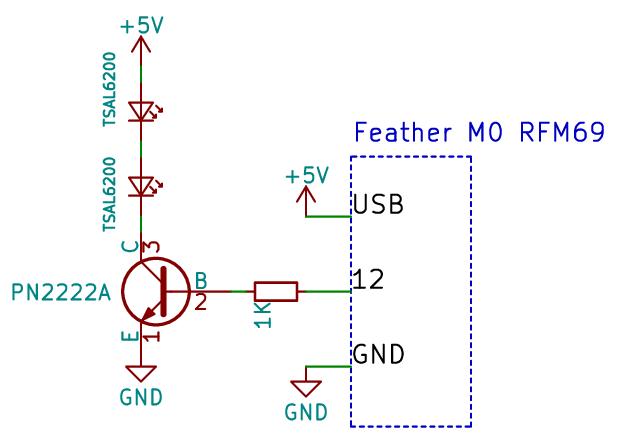
- Feather M0 RFM69: MCU (w/ built-in RFM69HCW: RF transceiver)
- TSAL6200 (2), N2222, 1K resistor: IR LEDs and driver
Here’s a link to the code running on the remote and the satellite transmitters: https://github.com/bobparadiso/OneButtonRemoteV2
- OneButtonRemote contains code running on the Teensy 3.5 board of the main remote.
- rf69_IR_transmitter contains code running on the Feather M0 RFM69 boards of any satellites you want to set up.
- config/demo contains files for the SD card, most important file being config.txt.
config.txt (which has instructions at the top) holds all the configuration for the menus. This device can be configured to control and number and combination of IR electronics in the person’s home including but not limited to TV, DVD player, cable box, radio, many ACs, etc. As such you need to choose what menus and menu options you want.
As mentioned, when you build the OneButtonRemote you have 2 options for IR transmitters depending on preference and need. Again, note that IR transmits line-of-sight (with some limited bouncing off objects). The option is selected at build time from the file IR.h.
#define SEND_CODE_IR
//#define SEND_CODE_IR_RF
The first define, as enabled here, means that the remote itself transmits the IR. If that define is commented out and the other is uncommented then IR timings are sent over RF (no line-of-sight restriction) to satellites which handle sending the IR and should be positioned optimally.
There are 2 main steps to configuration after you have physically assembled the device: customizing configuration within config.txt and recording the actual IR codes onto the SD card. Instructions for configuring config.txt are at the top of that file.
To record the IR codes you use the device itself and a terminal window on your computer to perform each step. The USB cable provides not only power during normal usage, but data exchange to your computer during setup. You can connect with a program such as Tera Term or CoolTerm and use a baud rate of 115200. The following commands are supported: record, play, dump
Each of these works with files on the SD card and either records IR, plays previously recorded IR, or dumps the recorded timings to the console respectively. So for example you can do the following:
- Hit enter to make sure you have a working prompt “:”.
- Type “record tvpow”.
- Confirm in the terminal that it is ready to record the IR code.
- Press power on your TV remote while pointing it at OneButtonRemote’s receiver.
- Confirm you see the recorded timings in the terminal.
- Test by typing “play tvpow” and watch to make sure that the TV responds by toggling its power.
Note: many newer TVs must first fully boot before responding to being turned off. They will ignore a power command if sent too soon after turning on or in some cases off.
In the above example a file named tvpow (note filenames are limited to 8 characters) was created and stores the IR timings for the TV power command. The name can be of your choosing and does not affect operation. The only important factors are the 8 character limitation, and that you exactly match the spelling you used in config.txt. In config.txt specific IR files are linked to specific menu options.
- Feather M0 RFM69: https://learn.adafruit.com/adafruit-feather-m0-radio-with-rfm69-packet-radio/setup
- Teensy 3.5: https://www.pjrc.com/teensy/td_download.html
- RF transmission if using satellites: http://www.airspayce.com/mikem/arduino/RadioHead/
- I2C module on LCD panel if using an LCD panel, and one of that type: https://bitbucket.org/fmalpartida/new-liquidcrystal/wiki/Home
