
Since my previous post about making a Go Baby Go car with motorized steering a few people have reached out to me with questions about the process. In response I’m offering here a much simpler to produce adaptation. To recap, this type of car can be really fun and useful for a child who is not able to use the original gas pedal and steering wheel. The previous method I presented required modifying the frame of the car and installing your own motor that would control the steering. As presented, it also involved installing and wiring up a pot to detect the current steering position and a microcontroller to monitor and control the steering. That setup affords a lot of control and flexibility but at a higher price of time and effort. The videos below show the result of the much simpler method of switch adapting the remote control of a ride on car with built-in motorized steering.
Switch adapting the remote control was mostly straightforward. You can see the steps I took in the pictures below.


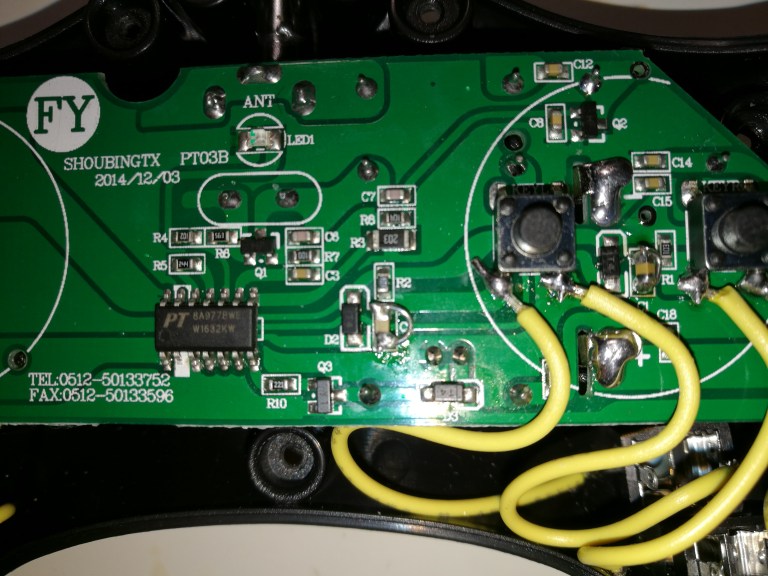
The one unusual step I took was shorting out 2 capacitors as pictured below to bypass them. Their function in the circuit was to limit how long the right and left turn commands could be sent.
I suspect the steering motor does not have any limit switches and they did not want someone forcing the motor against either of its stops for too long and possibly damaging it. This was a quick fix on their part and does somewhat lower the chance for damage, but this safety is not effective against repeatedly releasing and pressing again in the same given direction. Since these caps did from my testing cause usability issues with different lengths and types of switch cable, I chose to bypass them. If this safety is desired then they can be left in place and switches with shorter cables can be chosen. Or, the safety can be best re-implemented with limit switches added on the car for the steering.
Once the remote controller is switch adapted you can of course use any type and combination of accessibility switches you wish including buttons, joystick, sip-n-puff, etc. Here are some pictures of the joystick and bracket that I modified to have switch jack outputs.


This car I modified is a 12V Ride On Sports Car w/ Parent Control from BestChoiceProducts. Although not needed for this method of modification, below are pictures of the car’s receiver and the PCB inside (located under the seat and near the battery) for reference. The remote transmitter uses a PT8A977BWE and the care receiver uses a PT8A978BLWE. You can view the datasheet for those ICs here.


You could of course take the remote control out of the equation one of 2 ways. You can disconnect the motor connections from the car’s control electronics pictured above, and connect them to your own control circuit which will use switches as inputs. At that point you could ditch the existing PCB or keep it to control the car lights and sounds.
The other option is to keep this PCB, but remove just the receiver chip and drive the 4 relevant pads (Forward, Backward, Right, Left) directly. You could do this by adding your own microcontroller such as an Arduino, or more simply with the switch jacks (one side tied to VCC) and the other side on the target pad with a pull-down resistor.

Can you label the model joystick you ordered? Mine came with 5 wires (1 per direction and 1 ground) so now have to break the ground back out to four terminals to connect to the male switch jacks (3.5mm headphones jack) and then to the controller as you have it shown above.
We also recommend a motor speed controller between the battery and the controller to give the ability to slow the car down as it is very jerky. We tried this https://www.amazon.com/RioRand-Controller-Efficiency-Generating-Protection/dp/B007TH4EN6/ref=sr_1_31?ie=UTF8&qid=1530196287&sr=8-31&keywords=motor+controller
but maybe this would be better?
https://www.amazon.com/RioRandTM-Upgraded-6V-90V-Motor-Controller/dp/B00F839VNQ/ref=sr_1_10?ie=UTF8&qid=1530196670&sr=8-10&keywords=motor+controller
Finally we have been toying with 2 other ideas
1) a FOB based kill switch for safety:
https://www.amazon.com/Logisys-RM02-15AMP-Remote-Controls/dp/B00EQB8O7K/ref=pd_ybh_a_19?_encoding=UTF8&psc=1&refRID=4C8RMH0QZ7BW5PERWJ98
2) additional remote to allow parental input / control to help when needed. https://www.amazon.com/UFO-Controller-Transmitter-Accessories-Replacement/dp/B071S8Y3XM/ref=pd_ybh_a_5?_encoding=UTF8&psc=1&refRID=1TNED0RVHEYGWDGM9VTV
Thank you for all the help! Amazing work
Thank you Joe for your comments. I have updated the post with the joystick I used.
I did order and try the motor speed controller you linked to. As you may have also seen, sometimes using it in that way can cause issues since it is not only changing the voltage seen by the motors, but also what is seen by the car’s original control electronics. In my tests at some settings it worked as desired, but at more pronounced slow down it essentially causes the car electronics to reset, so you hear the car starting sound each time the gas is hit. If pushed too far, the car does not drive consistently. But, it is effective and quick if used within certain parameters. Thank you for mentioning it.
Thankfully w/ this car there is a built in 2-speed selector that on the slow setting seems to be not too jerky for larger kids.
If more control w/ less side effects is desired, I would suggest the compromise I mentioned in the post. Start with this car so that the motors for drive and steering are already in place. But, fully replace the control board with your own where you can PWM the motor drive signal to dial in the exact speed you want. There’s more custom electronics work that way, but it’s not too bad, and at least there’s no custom mechanical work needed.
One option is pairing an Arduino w/ a motor driver like one of these:
http://www.revrobotics.com/rev-11-1200/
https://www.amazon.com/DROK-Controller-Regulator-Industrial-Optocoupler/dp/B06XGD5SCB
Hi, I was just wondering how you installed the motor for the car. Did you use a rack and pinion system or did you use a belt and pulley system, or something else entirely?
Hi Rachael,
Sorry for the slow reply. Hopefully you’re already well on your way with your project. For the version in this post I used the car’s motorized steering mechanism as-is. It already had motorized steering. I highly recommend starting with a car like that. You can refer to my earlier post for a version I adapted that did not already have motorized steering, but due to the extra work required I do not recommend doing this unless you have a very specific reason.
Best,
Bob
Hello Bob, great job, very professionall! I connected the joystick with the controller as you explain but I either get the wheels to turn right or left without coming back to straight. Do you have any idea why this might be happening? Thanks!
Hello, and thank you for your comment. Do the wheels come back to straight if you not using the joystick at all (disconnected) and you are just using the original buttons on the controller? Are you using the same model car I was or a different one? At any rate, sometimes there can be an additional issue to work around such as in the case I showed in the post where I had to solder jumpers to bypass 2 of the capacitors on the controller. There are other work-arounds for these and other situations, but most important is to first confirm the controller does what you want when on its own. Fwiw, my company does consulting for these types of projects: https://accessredefined.org/
Bạn có sơ đồ đấu mạch này ko cho minh coi qua
Sorry, this is an older project and I do not have the circuit diagram. But for purposes of this project, all that is needed is tapping into the 2 connection points bridged by each of the buttons on the controller.